Introduction
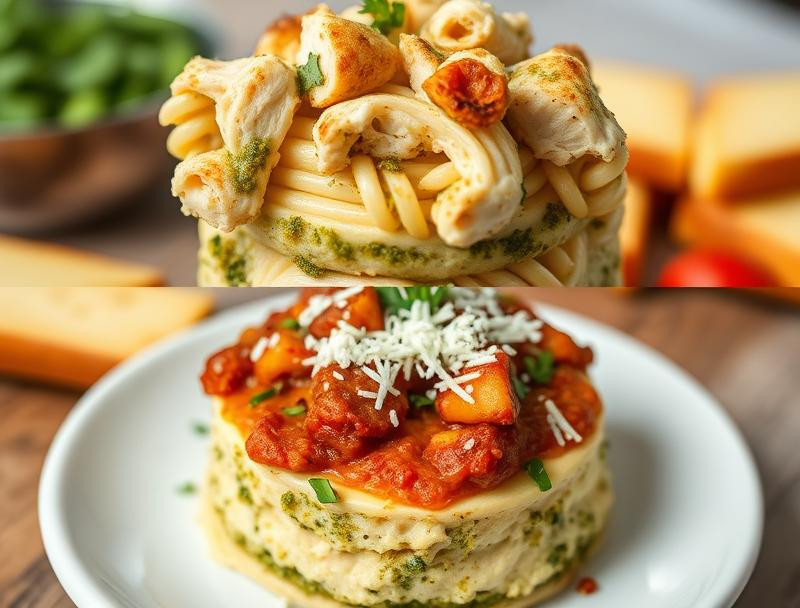
🍝👪 Hey there, fellow foodies! Are you ready to transform everyday ingredients into something truly delightful? Look no further! Today, we’re going to dive into a recipe that combines the best of Italian flavors with a twist that will leave you wanting more: Crispy Chicken Pesto Pasta Cheesecake Copycat. This dish is all about comfort food, perfect for a family dinner or a cozy night in with friends. It’s a creative take on traditional pasta, pesto, and cheesecake, melded together in a way that’s both surprising and satisfying. So, let’s get started and explore how to make this amazing dish! 🍴
Why This Works
🤔 This recipe is special for several reasons. First, it balances flavors beautifully, combining the richness of cheesecake, the freshness of pesto, and the crunch of chicken. It’s also remarkably easy to make, requiring minimal special equipment and using ingredients that are readily available. Plus, it’s accessible to a wide range of tastes and dietary preferences, with options to adjust the level of spice, the type of pasta, and more. Whether you’re a seasoned chef or a beginner in the kitchen, this Crispy Chicken Pesto Pasta Cheesecake Copycat is sure to impress. 🎉
Key Ingredients
🧈 1 cup unsalted butter, softened
🍝 8 oz pasta of your choice
🍗 1 lb boneless, skinless chicken breasts
🌿 1/2 cup fresh basil leaves
🧀 16 oz cream cheese, softened
🌽 1 cup grated mozzarella cheese
🌶 1/4 cup pesto sauce
🥚 2 large eggs
🍞 1 cup breadcrumbs
🧂 Salt and pepper to taste
Instructions
1️⃣ Preheat your oven to 375°F (190°C). Cook the pasta according to the package instructions until it’s al dente, then set it aside.
2️⃣ In a blender or food processor, combine the basil leaves, cream cheese, mozzarella cheese, pesto sauce, and a pinch of salt and pepper. Blend until smooth and creamy.
3️⃣ In a large bowl, combine the cooked pasta, the cheesecake mixture, and stir until the pasta is well coated.
4️⃣ Cut the chicken into bite-sized pieces and season with salt and pepper. Dip each piece into the beaten eggs and then coat in breadcrumbs.
5️⃣ Heat about 1/2 inch of oil in a large skillet over medium-high heat. Fry the chicken until it’s crispy and golden, about 5-7 minutes per side. Drain on paper towels.
6️⃣ In a greased 9-inch springform pan, create a layer of the pasta mixture. Top with a layer of fried chicken, then repeat, ending with a layer of pasta on top.
7️⃣ Bake for about 45 minutes, or until the top is lightly browned and the cheesecake is set.
8️⃣ Let it cool for a few minutes before slicing and serving. Enjoy! 😊
Handy Tips
📝 Always cook your pasta al dente to ensure it retains some bite and doesn’t become mushy in the cheesecake.
📝 For an extra crispy top, broil the cheesecake for 2-3 minutes after baking. Keep an eye on it to prevent burning.
📝 Consider using different types of pasta or cheese to give the dish your own unique twist.
Heat Control
🔥 When frying the chicken, it’s crucial to maintain the right temperature. If the oil is too hot, the chicken will burn on the outside before it’s fully cooked on the inside. Aim for a medium-high heat and adjust as needed to achieve that perfect golden crisp.
Crunch Factor
🌰 The crunch factor in this recipe comes from the fried chicken and the breadcrumbs. To enhance the crunch, ensure the chicken is fried until it’s golden and crispy, and don’t overcoat the chicken with breadcrumbs, as this can make it heavy.
Pro Kitchen Tricks
🎩 For a shortcut, use pre-made pesto sauce and store-bought breadcrumbs.
🎩 To boost flavor, add some dried herbs like thyme or oregano to the cheesecake mixture.
🎩 For a creative hack, use leftover chicken or pasta to make the dish more economical and reduce food waste.
Storage Tips
📦 To store leftovers, cool the cheesecake completely, then cover it with plastic wrap or aluminum foil and refrigerate for up to 3 days.
📦 For freezing, slice the cheesecake, wrap each slice tightly in plastic wrap or aluminum foil, and place in a freezer-safe bag for up to 2 months. Thaw frozen slices overnight in the fridge or reheat in the microwave.
Gift Packaging Ideas
🎁 If you’re giving this as a gift, consider packaging it in a decorative tin or a gift basket filled with Italian treats like olives, crackers, and a bottle of wine.
🎁 Wrap slices individually in decorative paper or bags and tie with a ribbon for a charming presentation.
Flavor Variations
🌟 Mushroom Twist: Add sautéed mushrooms to the pasta mixture for an earthy flavor.
🌟 Spicy Kick: Mix in some diced jalapeños or red pepper flakes into the cheesecake mixture for a spicy twist.
🌟 Veggie Delight: Replace the chicken with roasted or grilled vegetables like zucchini, bell peppers, or eggplant for a vegetarian option.
🌟 Seafood Surprise: Use cooked shrimp or scallops instead of chicken for a seafood-inspired cheesecake.
Troubleshooting
🤦♀️ Issue: Cheesecake doesn’t set.
🤦♀️ Fix: Ensure the oven temperature is accurate, and bake for a few more minutes.
🤦♀️ Issue: Chicken isn’t crispy.
🤦♀️ Fix: Check the oil temperature and don’t overcrowd the skillet.
🤦♀️ Issue: Pasta is overcooked.
🤦♀️ Fix: Cook the pasta al dente and rinse it with cold water to stop the cooking process.
FAQ
🤔 Q: Can I use gluten-free pasta?
🤔 A: Yes, gluten-free pasta works well in this recipe. Just adjust the cooking time according to the package instructions.
🤔 Q: Is this recipe suitable for vegetarians?
🤔 A: With some adjustments, like replacing the chicken with vegetables, this recipe can be vegetarian-friendly.
🤔 Q: Can I make this recipe ahead of time?
🤔 A: Yes, you can prepare the components (pasta, cheesecake mixture, fried chicken) ahead of time and assemble and bake when ready.
🤔 Q: What’s the best way to serve this dish?
🤔 A: Serve warm, sliced into wedges, and enjoy as a main dish or as part of a buffet.
Conclusion
👫 And there you have it, folks! A recipe that’s sure to become a family favorite. The Crispy Chicken Pesto Pasta Cheesecake Copycat is a unique, flavorful, and comforting dish that’s perfect for any occasion. Whether you’re a food enthusiast looking to try something new or a parent seeking a fun meal to make with your kids, this recipe has something for everyone. So go ahead, give it a try, and don’t hesitate to share your creations and variations with us on https://a.ratemyrecipes.com. Happy cooking, and buon appetito! 🍴👍
Crispy Chicken Pesto Pasta Cheesecake Just Like the Restaurant Version
A unique fusion of creamy cheesecake and savory crispy chicken pesto pasta, this dish is sure to impress your guests with its delightful flavors and textures.
Ingredients
- 2 cups cooked pasta (penne or fusilli)
- 1 cup cooked and shredded chicken
- 1 cup pesto sauce
- 8 ounces cream cheese, softened
- 1/2 cup sour cream
- 1/2 cup grated Parmesan cheese
- 1/2 cup shredded mozzarella cheese
- 2 large eggs
- 1 teaspoon garlic powder
- 1 teaspoon salt
- 1/2 teaspoon black pepper
- 1/2 cup breadcrumbs
- 1 tablespoon olive oil
Instructions
- Preheat the oven to 175u00b0C (350u00b0F).
- In a large mixing bowl, combine the cooked pasta, shredded chicken, and pesto sauce until well coated.
- In another bowl, beat the cream cheese until smooth. Add the sour cream, Parmesan cheese, mozzarella cheese, eggs, garlic powder, salt, and black pepper. Mix until well combined.
- Fold the pesto pasta mixture into the cream cheese mixture until evenly distributed.
- Grease a 9-inch springform pan and sprinkle the breadcrumbs on the bottom and sides.
- Pour the pasta and cheesecake filling into the prepared pan and smooth the top.
- Drizzle olive oil over the breadcrumbs for added crispiness.
- Bake in the preheated oven for 45-50 minutes or until the edges are golden and the center is set.
- Allow to cool for 10-15 minutes before carefully removing the springform pan.
- Slice and serve warm, garnished with additional pesto or Parmesan cheese if desired.
Tips
- For extra crunch, top with toasted pine nuts before serving.
- You can use store-bought pesto or make your own for a fresher taste.