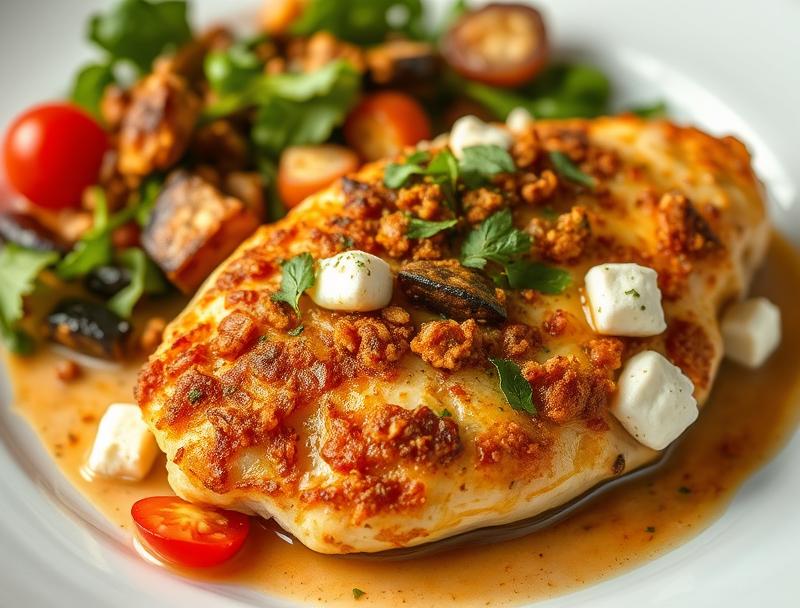
Baked Chicken with Crispy Feta & Vinaigrette – Savory, Crispy & Packed with Mediterranean Flavor!
Introduction
Imagine a dish that combines the juiciness of baked chicken, the crunch of crispy feta, and the zing of a refreshing vinaigrette, all while being incredibly easy to prepare and requiring only the most accessible ingredients. Welcome to the world of Baked Chicken with Crispy Feta & Vinaigrette, a culinary masterpiece that is not only a delight to the taste buds but also a testament to the simplicity and elegance of Mediterranean cuisine. This recipe is perfect for anyone looking to spice up their meal routine with a dish that is both flavorful and visually appealing, making it ideal for family dinners, gatherings, or even a quick, impressive meal for a special occasion.
Why This Works
- The balance of flavors in this dish is unparalleled, with the savory chicken, the salty crunch of feta, and the tangy vinaigrette coming together in perfect harmony.
- The accessibility of the ingredients and the straightforward preparation process make this dish a go-to for both novice and experienced cooks alike.
- Despite its simplicity, the presentation and taste of Baked Chicken with Crispy Feta & Vinaigrette are impressive, making it perfect for special occasions or when you want to treat your family and friends to something truly special.
Ingredients
- 4 boneless, skinless chicken breasts (about 6 oz each)
- 1 block of feta cheese, crumbled
- 1/4 cup of olive oil
- 2 cloves of garlic, minced
- 1 tablespoon of fresh lemon juice
- 1 teaspoon of dried oregano
- Salt and pepper, to taste
- 1 cup of mixed greens (for serving)
- 1 cup of cherry tomatoes, halved (for serving)
- 1/4 cup of red wine vinegar (for vinaigrette)
- 2 tablespoons of olive oil (for vinaigrette)
- Fresh parsley or dill, chopped (for garnish)
Instructions
- Step 1: Preparation – Preheat your oven to 400°F (200°C). Rinse the chicken breasts and pat them dry with paper towels. Season with salt, pepper, and dried oregano.
- Step 2: Baking the Chicken – Place the chicken breasts on a baking sheet lined with parchment paper, drizzle with a bit of olive oil, and bake in the preheated oven for about 20-25 minutes or until cooked through.
- Step 3: Crisping the Feta – While the chicken is baking, heat a small amount of olive oil in a skillet over medium heat. Add the crumbled feta cheese and cook, stirring occasionally, until it becomes crispy and golden brown.
- Step 4: Preparing the Vinaigrette – In a small bowl, whisk together red wine vinegar and olive oil to make the vinaigrette. Season with salt and pepper to taste.
- Step 5: Serving – Once the chicken is done, let it rest for a few minutes before slicing. Serve the sliced chicken on a bed of mixed greens, topped with crispy feta, cherry tomatoes, and a drizzle of the homemade vinaigrette.
Handy Tips
- For an extra crispy feta, make sure to not overcrowd the skillet and cook in batches if necessary.
- Adjust the amount of garlic and oregano according to your taste preferences.
- Consider using other types of cheese that can be crisped, like parmesan or halloumi, for a different flavor profile.
Heat Control
Maintaining the right temperature is crucial, especially when baking the chicken. Ensure your oven is at 400°F (200°C) for evenly cooked chicken. For the feta, medium heat is ideal to achieve the perfect crisp without burning.
Crunch Factor
The crunch in this dish comes from the crispy feta, which adds a satisfying texture contrast to the juicy chicken and fresh greens. To achieve the perfect crunch, cook the feta over medium heat, stirring occasionally, until it reaches your desired level of crispiness.
Pro Kitchen Tricks
- Marinating the chicken in a mixture of olive oil, lemon juice, and herbs for a few hours before baking can enhance the flavor.
- Using a meat thermometer can ensure the chicken is cooked to a safe internal temperature of 165°F (74°C).
- Letting the chicken rest before slicing can help retain its juices, making it more tender and flavorful.
Storage Tips
- Leftover chicken can be stored in an airtight container in the refrigerator for up to 3 days.
- Reheat the chicken in the oven or microwave until warmed through, taking care not to overheat.
- Crispy feta is best consumed immediately, but it can be stored in an airtight container at room temperature for up to a day.
Gift Packaging Ideas
If you’re considering gifting this dish, perhaps for a potluck or as part of a meal train, consider packaging the components separately to preserve freshness and texture. Use a decorative basket or container for the chicken, a small jar for the vinaigrette, and a sealed bag for the crispy feta and greens. Add a personal touch with a handwritten recipe card or a bouquet of fresh herbs.
Flavor Variations
- Experiment with different spices like paprika or cumin to give the chicken a unique flavor.
- Try various types of cheese for the crispy topping, such as parmesan or goat cheese, for different flavor profiles.
- Swap the mixed greens with roasted vegetables or quinoa for a heartier, more filling meal.
Troubleshooting
- If the feta doesn’t crisp up, it might be due to overcrowding the skillet or not cooking it long enough. Try cooking in batches and extending the cooking time.
- If the chicken is dry, it could be overcooked. Use a thermometer to ensure it reaches a safe internal temperature without overcooking!>
- For a too salty vinaigrette, balance it out with a bit more olive oil or a squeeze of fresh lemon juice.
FAQs
- Can I freeze it? – While it’s possible to freeze cooked chicken, the crispy feta and fresh greens are best prepared fresh. Consider freezing the chicken and then adding the toppings just before serving.
- Is it gluten-free? – This recipe is naturally gluten-free, making it a great option for those with dietary restrictions.
- Can I double the recipe? – Absolutely! Simply multiply all the ingredients by two and adjust the cooking time for the chicken as needed.
Conclusion
Baked Chicken with Crispy Feta & Vinaigrette is a true culinary delight that combines ease of preparation with impressive flavors and textures. Whether you’re a seasoned chef or a beginner in the kitchen, this recipe is sure to become a favorite. Feel free to experiment with the ingredients and flavors to make it your own, and don’t hesitate to share your creations with friends and family. The joy of cooking lies not just in the eating, but in the sharing and the love that goes into every dish. So go ahead, get creative, and bon appétit!