Strawberry Cheesecake Dessert Tacos – Crispy, Creamy & Totally Irresistible! 🍓🌮
Introduction
Imagine a dessert that combines the sweetness of strawberries, the creaminess of cheesecake, and the crunch of a taco shell. Sounds like a dream, right? Well, we’re about to make that dream a reality with our Strawberry Cheesecake Dessert Tacos recipe! This innovative dessert is not only delicious, but it’s also surprisingly easy to make using everyday ingredients. The best part? It’s perfect for anyone looking to impress their friends and family with a unique and mouth-watering treat. So, let’s dive in and explore the world of dessert tacos!
Why This Works
- Flavor balance and ingredient accessibility: The combination of sweet strawberries, tangy cheesecake, and crunchy taco shells creates a perfect balance of flavors. Plus, all the ingredients are easily accessible at your local grocery store.
- Ease of preparation: This recipe is surprisingly simple to prepare, requiring minimal cooking and effort. You can have your dessert tacos ready in no time!
- Impressive results with minimal effort: The presentation of these dessert tacos is sure to impress your guests, and the best part is that it requires minimal effort. Just assemble the ingredients, and you’re good to go!
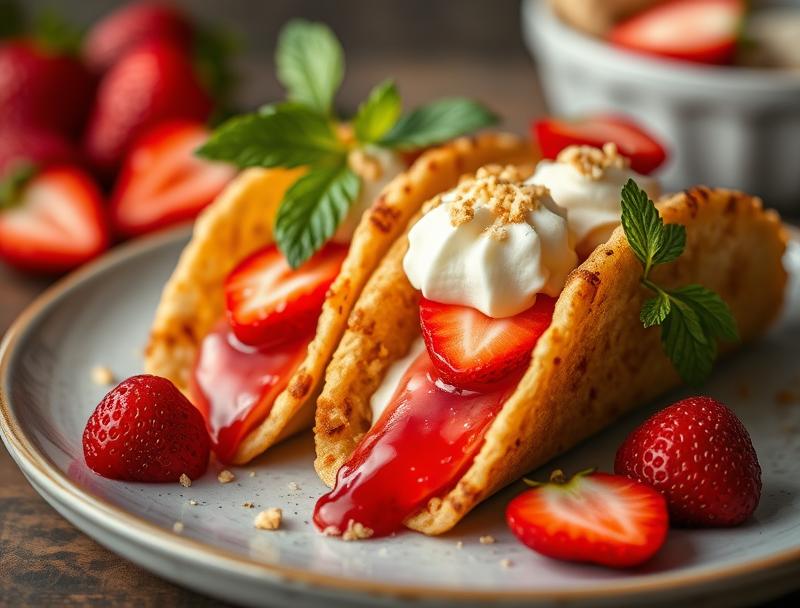
Ingredients
- 1 package of taco shells (about 12-15 shells)
- 1 cup of strawberries, hulled and sliced
- 1 cup of cheesecake filling (store-bought or homemade)
- 1/4 cup of granulated sugar
- 1/4 cup of whipped cream
- 1 tablespoon of honey
- 1/4 teaspoon of vanilla extract
- Chopped fresh strawberries and whipped cream for garnish
Instructions
- Step 1: Begin by preparing your ingredients. Slice the strawberries and set them aside. If using store-bought cheesecake filling, follow the package instructions to soften it. If making your own cheesecake filling, prepare it according to your recipe and set it aside to chill.
- Step 2: In a small bowl, mix together the granulated sugar, honey, and vanilla extract. Add this mixture to the cheesecake filling and mix until well combined.
- Step 3: Assemble the dessert tacos by spooning a small amount of the cheesecake mixture into each taco shell. Top the cheesecake mixture with a few slices of strawberry and a dollop of whipped cream.
- Step 4: Garnish the dessert tacos with chopped fresh strawberries and a sprinkle of granulated sugar. Serve immediately and enjoy!
Handy Tips
- Make sure to handle the taco shells gently to avoid breaking them. You can also warm them up in the oven for a few minutes to make them more pliable.
- If using store-bought cheesecake filling, you can customize it to your taste by adding different flavor extracts or mix-ins.
- Don’t overfill the taco shells, as this can make them difficult to handle and prone to breaking.
Heat Control
This recipe does not require any heat, as the cheesecake filling and whipped cream are best served chilled. However, if you want to warm up the taco shells, you can bake them in a preheated oven at 350°F (180°C) for 5-7 minutes, or until they are lightly toasted and fragrant.
Crunch Factor
The crunch factor in this recipe comes from the taco shells, which provide a satisfying crunch to the dessert. To achieve the perfect crunch, make sure to handle the taco shells gently and avoid overfilling them. You can also experiment with different types of taco shells, such as chocolate or cinnamon sugar-coated shells, to add an extra layer of flavor and texture.
Pro Kitchen Tricks
- Use a piping bag to fill the taco shells with the cheesecake mixture for a more polished and professional look.
- Experiment with different types of fruit, such as blueberries or raspberries, to create a unique and delicious flavor combination.
- Make the dessert tacos ahead of time and store them in the refrigerator for up to 2 hours before serving. This will allow the flavors to meld together and the taco shells to stay crisp.
Storage Tips
- Store any leftover dessert tacos in an airtight container in the refrigerator for up to 24 hours.
- Keep the taco shells separate from the cheesecake mixture and whipped cream to prevent them from becoming soggy.
- Freeze the cheesecake mixture for up to 2 months and thaw it overnight in the refrigerator before using.
Gift Packaging Ideas
These dessert tacos are perfect for gift-giving, especially during the holiday season. You can package them in cute containers or bags and tie them with a ribbon. Add a personalized note or card to make it an extra-special gift. You can also create a dessert taco bar with different toppings and fillings and let your guests create their own dessert tacos.
Flavor Variations
- Try using different types of fruit, such as peaches or pineapple, to create a unique and delicious flavor combination.
- Add a sprinkle of cinnamon or cocoa powder to the cheesecake mixture for an extra boost of flavor.
- Use different types of nuts, such as almonds or pecans, to add a crunchy texture to the dessert tacos.
Troubleshooting
- If the cheesecake mixture is too thick, you can thin it out with a little bit of milk or cream.
- If the taco shells are too brittle, you can try warming them up in the oven for a few minutes to make them more pliable.
- If the whipped cream is too runny, you can try chilling it in the refrigerator for a few minutes to firm it up.
FAQs
- Can I freeze the dessert tacos? Yes, you can freeze the dessert tacos for up to 2 months. However, it’s best to freeze the cheesecake mixture and whipped cream separately and assemble the dessert tacos just before serving.
- Is this recipe gluten-free? Yes, this recipe is gluten-free, making it perfect for those with gluten intolerance or sensitivity.
- Can I double the recipe? Yes, you can easily double or triple the recipe to make more dessert tacos. Just keep in mind that you may need to adjust the amount of cheesecake mixture and whipped cream accordingly.
Conclusion
And there you have it – a delicious and unique dessert recipe that’s sure to impress your friends and family. The Strawberry Cheesecake Dessert Tacos are a game-changer, and we’re confident that you’ll love them just as much as we do. So go ahead, get creative, and have fun with this recipe! Don’t be afraid to experiment with different flavors and toppings to make it your own. Happy cooking, and we’ll see you in the next recipe!