Irresistible Homemade Twix Cookies
Introduction
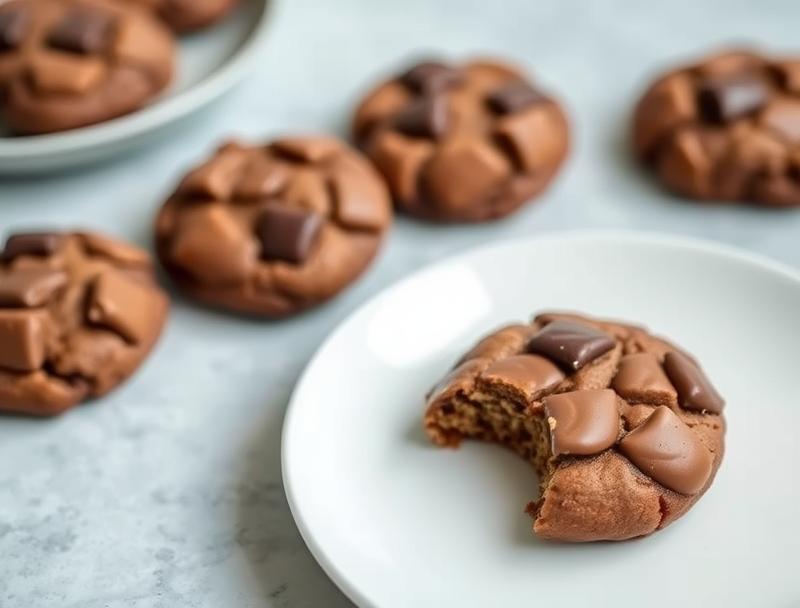
Imagine a cookie that combines the crunch of a shortbread base, the chew of a caramel middle, and the richness of a chocolate top – all in one delicious package. Welcome to the world of Irresistible Homemade Twix Cookies, where creativity meets simplicity and flavor knows no bounds. Using everyday ingredients, these cookies are not only a delight to eat but also incredibly easy to make, requiring minimal effort for a result that’s sure to impress both kids and adults alike. Whether you’re a seasoned baker or a beginner in the kitchen, this recipe is a must-try for anyone with a sweet tooth and a penchant for the iconic Twix bar.
Why This Works
- Flavor balance and ingredient accessibility: The combination of buttery shortbread, gooey caramel, and decadent chocolate creates a flavor profile that’s both balanced and indulgent, all made possible with ingredients easily found in most grocery stores.
- Ease of preparation: Despite their impressive appearance and taste, these cookies are surprisingly straightforward to prepare, requiring basic kitchen tools and techniques that won’t intimidate even the most novice baker.
- Impressive results with minimal effort: What sets these cookies apart is the disproportionate return on investment – with a bit of patience and some simple steps, you’ll end up with a batch of cookies that look and taste like they came from a professional bakery, perfect for special occasions or everyday treats.
Ingredients
- 2 1/4 cups all-purpose flour
- 1 tsp baking powder
- 1 tsp salt
- 1 cup unsalted butter, softened
- 1/2 cup granulated sugar
- 1/4 cup confectioners’ sugar
- For the caramel: 1 cup granulated sugar, 1/2 cup light corn syrup, 1/2 cup heavy cream, 1 tsp sea salt, 1 tsp unsalted butter
- For the chocolate: 1 cup semisweet chocolate chips
Instructions
- Step 1: Preheat your oven to 300°F (150°C). Line a baking sheet with parchment paper. In a medium bowl, whisk together the flour, baking powder, and salt. Set aside.
- Step 2: In a large bowl, use an electric mixer to beat the butter and sugars until light and fluffy, about 2-3 minutes. Gradually mix in the flour mixture until a dough forms. Wrap the dough in plastic and refrigerate for at least 30 minutes.
- Step 3: On a lightly floured surface, roll out the dough to about 1/4 inch thickness. Cut into desired shapes. Place on the prepared baking sheet, leaving about 1 inch of space between each cookie. Bake for 18-20 minutes, or until lightly golden. Allow the cookies to cool completely on the baking sheet.
- Step 4: For the caramel, combine the sugar, corn syrup, and 1/2 cup of the heavy cream in a small saucepan. Place over medium heat and cook, stirring occasionally, until the sugar has dissolved. Bring to a boil, then reduce the heat to medium-low and simmer for about 10-12 minutes, or until the caramel turns a deep amber color. Remove from heat and slowly pour in the remaining 1/2 cup heavy cream (be careful as it will bubble up). Return to low heat and cook, stirring constantly, until the caramel is smooth. Stir in the butter and sea salt until melted. Allow the caramel to cool and thicken slightly.
- Step 5: To assemble, place a small spoonful of caramel onto a cooled cookie, spreading it slightly. Melt the chocolate chips in a double boiler or in the microwave in 30-second increments, stirring between each interval until smooth. Spread a layer of chocolate over the caramel. Repeat with the remaining cookies.
Handy Tips
- For a crisper shortbread, bake the cookies for an additional 2-3 minutes. Keep an eye on them to prevent overbrowning.
- To prevent the caramel from becoming too hard, don’t overcook it. The ideal consistency should be thick but still slightly sticky when cooled.
- Experiment with different types of chocolate for the top layer, such as milk chocolate for a sweeter treat or white chocolate for a contrasting flavor.
Heat Control
When making the caramel, it’s crucial to control the heat carefully. The ideal temperature for caramelizing sugar is between 338°F and 345°F (170°C to 173°C), which is the hard-ball stage. This stage is reached when the caramel turns a deep amber color and has a rich, caramel aroma. Be patient and stir occasionally to prevent burning.
Crunch Factor
The crunch factor in these cookies comes from the shortbread base and the texture contrast provided by the caramel and chocolate layers. To enhance the crunch, ensure the shortbread is baked until it’s lightly golden and firm to the touch. The caramel should be cooked to a point where it’s thick and slightly chewy, providing a nice textural contrast to the crunchy shortbread and smooth chocolate.
Pro Kitchen Tricks
- Use parchment paper or a silicone mat on your baking sheet to prevent the cookies from sticking and to make cleanup easier.
- For a more professional look, use a cookie stamp or a small knife to create patterns on the cookies before baking.
- Keep your ingredients, especially the butter and chocolate, at room temperature for easier mixing and melting.
Storage Tips
- Store the cookies in an airtight container at room temperature for up to 5 days. If you live in a humid climate, consider storing them in the refrigerator to keep them fresh for longer.
- For longer storage, the cookies can be frozen for up to 2 months. Place them in a single layer in a freezer-safe bag or container, making sure they don’t touch each other to prevent sticking.
- When reheating frozen cookies, let them thaw at room temperature or reheat them in the microwave in short increments until the chocolate is melted and the caramel is slightly gooey.
Gift Packaging Ideas
These cookies make perfect gifts for any occasion, from birthdays to holidays. Consider packaging them in decorative jars, gift tins, or even wrap them individually in cellophane bags and tie with a ribbon. For a more personalized touch, include a handwritten note or a small gift card to a favorite coffee shop, suggesting they enjoy their cookie with a cup of coffee or hot chocolate.
Flavor Variations
- Different spices: Add a pinch of sea salt or a teaspoon of vanilla extract to the shortbread dough for added depth of flavor.
- Creative toppings: Before the chocolate hardens, sprinkle the top of the cookies with chopped nuts, shredded coconut, or even candy pieces for added texture and visual appeal.
- Ingredient swaps: Substitute the semisweet chocolate with milk chocolate or white chocolate for a different flavor profile. You can also use different types of sugar, like brown sugar, for a richer caramel flavor.
Troubleshooting
- Texture problems: If the shortbread is too crumbly, it might be overbaked. If the caramel is too hard, it was overcooked. Adjust the baking and cooking times accordingly in your next batch.
- Ingredient replacements: If you’re out of a specific ingredient, consider substitutions. For example, you can use light brown sugar instead of granulated sugar for the caramel, or almond flour for a gluten-free shortbread option.
- Over/undercooking signs: Keep an eye on your cookies and caramel. Overbaked cookies will be dark and hard, while undercooked caramel will be too runny. Adjust your cooking times based on your oven’s performance and the specific ingredients used.
FAQs
- Can I freeze it? Yes, the cookies can be frozen for up to 2 months. It’s best to freeze them before adding the chocolate layer.
- Is it gluten-free? The original recipe includes wheat flour, making it not gluten-free. However, you can substitute the flour with a gluten-free flour blend to make it suitable for those with gluten intolerance.
- Can I double the recipe? Yes, you can easily double or triple the recipe to make more cookies. Just ensure you have enough baking sheets and storage containers.
Conclusion
Making Irresistible Homemade Twix Cookies is a journey of discovery and delight, combining simple, accessible ingredients with straightforward techniques to produce a treat that’s greater than the sum of its parts. Whether you’re baking for yourself, your family, or as a gift for friends, these cookies are sure to bring joy and satisfaction. Feel free to experiment with different flavors and toppings, and don’t hesitate to reach out with your creations and tips. Happy baking, and let the sweetness begin!