Whimsical Autumn Treats: Pumpkin Patch Dirt Cups
Introduction
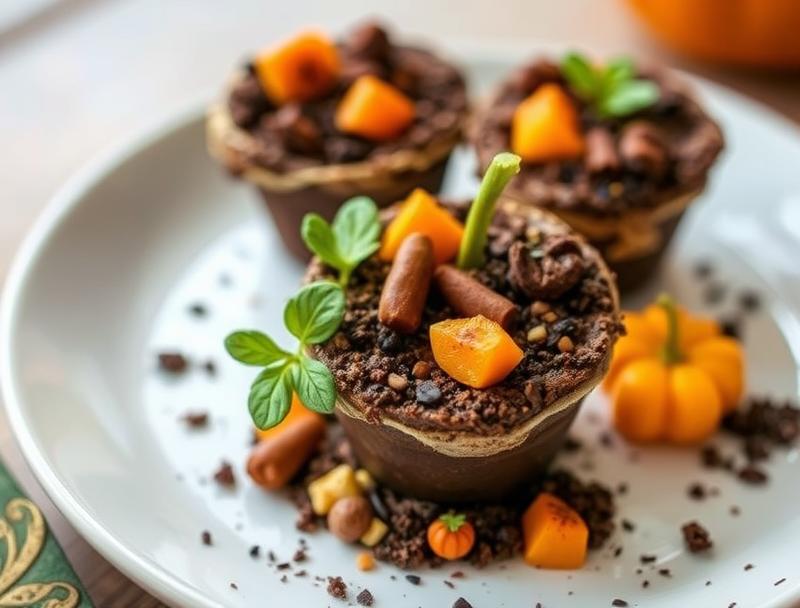
As the leaves change colors and the air grows crisp, our taste buds crave the warm, comforting flavors of autumn. One treat that embodies the whimsy and delight of this season is the Pumpkin Patch Dirt Cup. These adorable desserts are not only a feast for the eyes, with their miniature pumpkin patches and tiny gourds, but also a symphony of textures and tastes, combining the richness of chocolate, the spiciness of pumpkin, and the crunch of cookies. The best part? They’re incredibly easy to make, requiring just a few everyday ingredients and some creative flair. In this article, we’ll guide you through the process of crafting these enchanting treats, from preparation to presentation, and share some expert tips and variations to make your Pumpkin Patch Dirt Cups truly unforgettable.
Why This Works
- Flavor balance and ingredient accessibility: The combination of chocolate, pumpkin, and spices creates a perfectly balanced flavor profile that’s both familiar and exciting. Plus, all the ingredients are easily found in most supermarkets, making this recipe accessible to everyone.
- Ease of preparation: Despite their impressive appearance, Pumpkin Patch Dirt Cups are surprisingly simple to prepare. The recipe involves minimal cooking and can be ready in under 30 minutes, making it perfect for a quick dessert or snack.
- Impressive results with minimal effort: The presentation of these treats is what truly sets them apart. With a little creativity, you can transform a simple dessert into a miniature pumpkin patch that’s almost too cute to eat. This makes them ideal for parties, gatherings, or as a special treat for the kids.
Ingredients
- 1 package of chocolate pudding mix
- 1 cup of milk
- 1/2 cup of heavy cream
- 1/4 cup of pumpkin puree
- 1 tsp of pumpkin spice
- 1 cup of crushed Oreo cookies
- 1 cup of whipped cream
- Miniature pumpkin candies or sprinkles for decoration
Instructions
- Step 1: Begin by preparing the chocolate pudding according to the package instructions, using the milk and heavy cream. Stir in the pumpkin puree and pumpkin spice until well combined.
- Step 2: Spoon the pudding mixture into small cups or ramekins, filling them about 3/4 of the way full.
- Step 3: Top each cup with a layer of crushed Oreo cookies to resemble dirt. You can also add a few gummy worms on top for a fun touch.
- Step 4: Finish each cup with a dollop of whipped cream and decorate with miniature pumpkin candies or sprinkles to create your pumpkin patch.
Handy Tips
- For an extra creamy pudding, make sure to chill it in the refrigerator for at least 30 minutes before serving.
- If you can’t find pumpkin spice, you can make your own by mixing together cinnamon, nutmeg, and ginger.
- Experiment with different types of cookies for the “dirt” layer, such as chocolate sandwich cookies or wafers, for a unique flavor and texture.
Heat Control
Since this recipe doesn’t involve any cooking, you don’t have to worry about heat control. However, if you’re using a different type of pudding that requires cooking, make sure to follow the package instructions for the correct temperature and timing.
Crunch Factor
The crunch factor in these Pumpkin Patch Dirt Cups comes from the layer of crushed Oreo cookies on top. To achieve the perfect crunch, make sure to crush the cookies finely so they resemble dirt. You can also add some chopped nuts or candy pieces to the cookie layer for extra texture and flavor.
Pro Kitchen Tricks
- To make your whipped cream extra stable and long-lasting, add a pinch of salt or a teaspoon of cornstarch to the mixture before whipping.
- For a more intense pumpkin flavor, use roasted pumpkin puree instead of canned. Simply roast a small pumpkin in the oven until soft, then scoop out the flesh and blend until smooth.
- To make your Pumpkin Patch Dirt Cups more festive, use edible decorations such as candy leaves, acorns, or pumpkins to create a miniature autumn scene on top of each cup.
Storage Tips
- These treats are best served fresh, but you can store them in the refrigerator for up to 24 hours.
- If you’re not serving the Pumpkin Patch Dirt Cups immediately, you can prepare the pudding and cookie layers ahead of time and store them separately in the refrigerator until ready to assemble.
- For a longer shelf life, you can also freeze the assembled cups for up to 2 months. Simply thaw in the refrigerator overnight before serving.
Gift Packaging Ideas
If you want to give these adorable treats as a gift, consider packaging them in small mason jars or containers with a decorative lid or ribbon. You can also add a gift tag with a cute message or a packet of hot cocoa mix to make it a complete autumn-themed gift.
Flavor Variations
- Try using different flavors of pudding, such as vanilla or caramel, for a unique twist on the classic recipe.
- Add some spice to your Pumpkin Patch Dirt Cups by mixing in a pinch of cayenne pepper or red pepper flakes into the pudding mixture.
- For a boozy twist, soak some raisins or cranberries in a liquor of your choice (such as rum or Grand Marnier) and add them to the pudding mixture for an adult-only treat.
Troubleshooting
- If your pudding is too thin, try chilling it in the refrigerator for a few hours to firm it up. If it’s still too thin, you can add a little more pudding mix or cornstarch to thicken it.
- If your whipped cream is too runny, try adding a pinch of salt or a teaspoon of cornstarch to stabilize it. You can also chill it in the refrigerator for a few hours to firm it up.
- If your cookies are too crunchy, try crushing them finer or using a different type of cookie that’s softer and more prone to crumbling.
FAQs
- Can I freeze it? Yes, you can freeze the assembled Pumpkin Patch Dirt Cups for up to 2 months. Simply thaw in the refrigerator overnight before serving.
- Is it gluten-free? Depending on the type of cookies you use, these treats can be gluten-free. Simply choose a gluten-free cookie option, such as gluten-free Oreos or wafers, to make the recipe gluten-free.
- Can I double the recipe? Yes, you can easily double or triple the recipe to make more Pumpkin Patch Dirt Cups. Simply multiply the ingredients accordingly and assemble the cups as instructed.
Conclusion
With these Pumpkin Patch Dirt Cups, you’ll have a delicious and adorable dessert that’s perfect for the autumn season. Whether you’re serving them at a party, giving them as a gift, or simply enjoying them as a special treat, these whimsical treats are sure to delight both kids and adults. So go ahead, get creative, and make your own Pumpkin Patch Dirt Cups today! Don’t forget to share your creations with us on social media and tag us in your posts. Happy baking and happy autumn!
Whimsical Autumn Treats: Pumpkin Patch Dirt Cups
A delicious and adorable dessert perfect for the autumn season, featuring chocolate pudding, pumpkin puree, and crushed Oreo cookies.
🥘 Ingredients
👩🍳 Instructions
-
1Prepare the chocolate pudding according to the package instructions, using the milk and heavy cream. Stir in the pumpkin puree and pumpkin spice until well combined.
-
2Spoon the pudding mixture into small cups or ramekins, filling them about 3/4 of the way full.
-
3Top each cup with a layer of crushed Oreo cookies to resemble dirt. You can also add a few gummy worms on top for a fun touch.
-
4Finish each cup with a dollop of whipped cream and decorate with miniature pumpkin candies or sprinkles to create your pumpkin patch.